All About Protective Styles with Stylist Kelly Wood

Bi-coastal stylist Kelly Wood is not only knowledgeable about hair of every type, protective styles and texture, but also passionate about continuously learning and sharing her knowledge. That’s why we jumped at the opportunity to have her talk to us about a small portion of her extensive experience, and teach us how to create her hair-healthy styles.
About Kelly
Name: Kelly Wood
About Me: I am a Los Angeles native who finds hair inspo in everyday living. I’m a 3rd Generation, Bicoastal, hair stylist that takes pride in my inclusive skill set. I specialize in styling ALL curl types and textures of hair. Combining my knowledge and love for natural hairstyling with my techniques, my goal is to empower both new and older generations of stylists seeking to grow in their skills and knowledge of natural hair, all textures included. My hope is to leave a lasting mark on the hair industry one day at a time, starting with my community extending around the world.Location: NYC/MIA/LA – Currently NY
Why are protective styles important and which hair types benefit the most from protective styles?
Protective styles keep your hair healthy. They’re important because curly, kinky, textured, natural hair is typically more sensitive when it comes to everyday wear and tear. Protective styles essentially give your hair a break from manipulation and the elements.
Why is identifying your hair type important to your care and color routine?
I think identifying your hair type makes it easier for clients to understand their hair individually. I find that everyone’s hair is very different in texture yes but also healthwise. Your diet and your water intake can be big factors in how strong, or weak, or dry your hair is. When I’m asked about color, I always individually assess my clients based on hair type, texture, and lifestyle. I believe all of these things play a big role when it comes to a color routine.
When wearing protective styles, do you have any tips for safely coloring hair?
First off, I do not condone clients using professional color at home. Which is why I love oVertone so much, it’s very gentle on the hair and works as a hair mask. Protective styles are typically done AFTER a color job, putting color over box braids for example (another awesome protective style) would be like tie-dying a shirt. A lot of inconsistencies in the color. Unless you’re into that sort of thing I would suggest clients color their hair before doing a protective style.
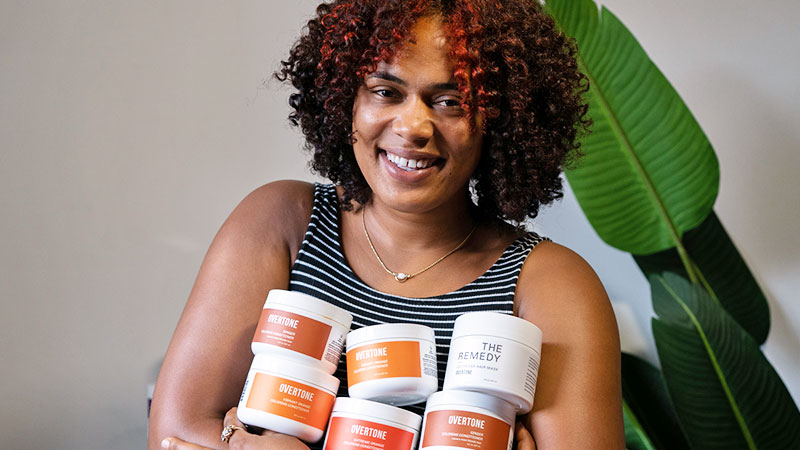
Why is oVertone the best choice for coloring protective styles?
I love that oVertone is gentle. I use it on my own curls. I bleached my hair to a level 10 which is the lightest you can go. Bleach obviously has a lot of potential to cause damage to your natural hair. So, the idea of adding a healthy alternative to my coloring routine really caught my attention. I specialize in natural hair, so my main focus is always the HEALTH of the hair first. Which means I’m always looking for healthy alternatives for my clients too. It’s why I choose to round brush my clients hair instead of a hard press. It’s why I vet my color clients, and why I suggest oVertone. It’s perfect for anyone wanting to play with color without the possible damage permanent hair color causes.
Step-By-Steps
STYLE #1: Flat Twists/Twist out
Model name: Ayana O’Neal
Model hair type: Naturally Curly Hair
Model starting hair color: Light and dark brown. Top lightened by the sun. Added light pieces for aesthetic.
oVertone products used: Ginger, Vibrant Orange

Before:
Prep, including equipment, strand testing, etc.
- Gloves
- Wide tooth Comb, detangling brush
- Clips
What products/tools/processes did you do before coloring/styling the hair?
- Ayana prepped her hair by having it washed and air dried
- I gave her a fresh curly cut.
- Pre-lightened her bangs as a money piece
How-To:
How you applied color
- I sectioned the hair in 5 sections
- I started applying color in the back first, making sure to use my hands.
- I saturated the hair section by section. From roots to end.
- I used extreme orange on her dark hair, and Ginger on her lighter pieces to give her fringe some funky dimension.
- Put a timer for 15 minutes.
- I make sure to wash her hair after the color just to ensure all of the product is removed and to ensure her hair is weightless. Rinse until the water runs clear.
Step by step instructions on the style
- Properly wash, and detangle the hair
- I add her desired part. She has a lot of hair, I make sure to keep her hair in sections so I don’t get overwhelmed and to keep the hair moist.
- I added about 10 flat twists to the hair. Not too tight since we’re looking for a looser curl. If you want tighter curls for the style to last longer take smaller sections and tighter twists.
- I let air dry , I showcase how to wrap your hair for bed
- Once the twists dried completely I removed the twists very carefully. Making sure my hands have been moisturized and making sure I have serum or oil on my hands to prevent and frizz
After:
How did your hair feel?
- Her hair felt great! Very soft and lightweight.
What are the benefits of this protective style and how long does it last?
- Benefits of this protective style is controlling the way the hair air dries.
- If Ayana wanted to wear her protective style for a week before she unravelled her hair she totally could. She would take out her twists and wear her hair out for another week depending on how she sleeps and how creative she is with styling her hair as her curls fall.
Maintenance (for both color and style, if applicable)
- I always suggest a cold rinse every time you wash or wet down your curls. It’s great for keeping the color but also is good for natural shine and closing your cuticles. ( The same way we do with our skin )
- Whenever my clients sleep with their twist-outs, I suggest putting your hair in a pineapple ( gathering all of your curls to the top of your head) if your curls are past the shoulder. I suggest only using a crease-free hair tie, or a big 80’s scrunchie to keep from putting weird dents and creases in your hair. Don’t forget to wear a silk or satin bonnet over your pineapple when sleeping.
- If your hair is above the shoulder I would suggest leaving it down and wearing a satin bonnet. If you have the patience you can re-twist your hair at night to guarantee the style the next day.
* A big benefit of using satin or silk bonnet is it prevents friction with your pillow and helps prevent unwanted frizz
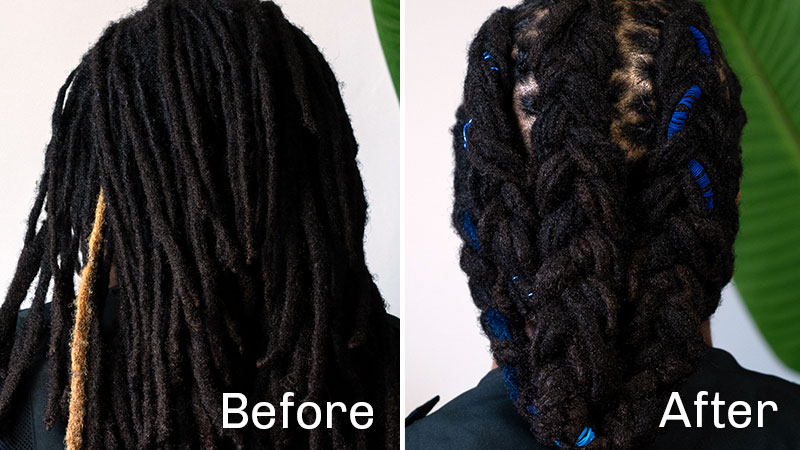
STYLE #2: Natural Locs/Loc Retwist/Braided Locs
Model name: Elliot Hyppolite
Model hair type: Loc’d (Note: I want to make sure I’m addressing verbiage when talking about this hairstyle. I think it’s important to let our audience know the term ‘Dread’ can be offensive, it has a very negative connotation. I think the best term to use is ‘Loc’ when talking about this style.)
Model starting hair color: Natural Brown / Light pieces added
oVertone product used: Blue for Brown Hair, Vibrant Purple
Before:
Prep, including equipment, strand testing, etc.
- Duck bill clips
- Monster clips
- Locking gel
What products/tools/processes did you do before coloring/styling the hair?
- I washed and conditioned elliot’s Loc’s as preparation for our protective style
- Occasionally with Locs I will add ACV ( apple cider vinegar ) to a tub of water and let the locs soak to get rid of any build up.
- I lightened one lock. My model is very shy when it comes to hair changes. So I thought one colorful lock would be awesome for him to start his Overtone journey. I will say as soon as I finished his hair he LIT UP. He instantly wanted more color. And I sent him home with the colors I used.
How-To:
How you applied color
- I sectioned his hair so I could see the “lucky loc”
- Because Locs have a concentrated amount of hair in one , it is very important to over saturate the hair with product to make sure the color can last as long as possible.
- I applied the dark blue to the roots to mid-shaft, I applied vibrant purple to the ends for an ombré effect.
- After applying color I suggest covering with a plastic cap
* This step isn’t necessary in order for the color to take, I just think for this style it allows the color conditioner to penetrate deep into the hair for a longer lasting result.
5. I set a timer for 15 minutes.
Step by step instructions on the style
- After washing out the color, I towel dry his locs gently. I think Microfiber towels work best for naturally curly/textured hair to avoid frizz.
- I section his hair starting in the back and palm roll each individual loc with a locking gel
- I secure each loc with duckbill clips so they can dry neatly.
- After finishing the entire head I added blue tinsel to dress up his locs.
- I section the hair to cornrow his locs neatly so they can continue drying.
After:
How did your hair feel?
- His hair felt really nice! When lightening locs (or hair in general ) there is always a possibility for hair to be very dry afterwards. I feel like the overtone worked as a treatment while the color was depositing. I loved that.
What are the benefits of this protective style and how long does it last?
- After washing Locs they can become extremely heavy with the excess water it soaks up. This style allows them to air dry throughout the week. It’s Important to get rid of most of the moisture in the hair so the hair doesn’t dry sour. ( an example of “sour” hair is sleeping with a wet bun and taking it down 4 days later… that smell )
- I like putting locs in cornrows because it gives them a natural wave when you take them out.
Maintenance (for both color and style, if applicable)
- I always suggest a cold rinse every time you wash or wet down your curls. It’s great for keeping the color but also is good for natural shine and closing your cuticles. ( The same way we do with our skin )
- I think guys should wrap their hair too! The silk bonnet isn’t very manly but it definitely keeps your hair soft and frizz free. Man or woman, everyone wants frizz free hair. I like a big bonnet option over a du-rag because it holds and protects all of your hair, not just the newly twisted top.
* satin and silk bonnets can be hot and sometimes uncomfortable if you’re not used to wearing it. A great alternative is a silk or satin pillowcase. They keep your hair soft and causes little to no friction to help prevent frizz
3. Elliot can wear his protective style as long as he desires. The longer you leave the protective style the deeper the wave/curl you get later.

Ready to apply your new shade?